Github认证
此模块提供了Github认证,并且支持在开发环境采用模拟用户登录,使得开发与调试非常方便
安装模块
bash
$ pnpm add vona-module-a-authgithub -w如何使用
1. 登录
typescript
class ControllerStudent {
  @Web.get('login')
  @Passport.public()
  async login() {
    await this.bean.auth.authenticate(
      'a-authgithub:github',
      { state: { redirect: '/' } },
    );
  }
}2. 退出登录
typescript
await this.bean.passport.signout();3. 设置认证凭据
在 App Config 中设置认证凭据
src/backend/config/config/config.ts
typescript
// onions
config.onions = {
  authProvider: {
    'a-authgithub:github': {
      clients: {
        default: {
          clientID: 'xxxxxx',
          clientSecret: 'xxxxxxx',
        },
      },
    },
  },
};clients.default: 一个 Provider 可以设置多个 Clients,默认是default
4. 添加更多Client凭据
- 首先采用接口合并机制添加 Client 类型定义
在 VSCode 编辑器中,输入代码片段recordauthclient,自动生成代码骨架:
typescript
declare module 'vona-module-x-x' {
  export interface IAuthProvider_xxx_ClientRecord {
    : never;
  }
}调整代码:
typescript
declare module 'vona-module-a-authgithub' {
  export interface IAuthProviderGithubClientRecord {
    another: never;
  }
}- 然后在 App Config 中设置认证凭据
diff
// onions
config.onions = {
  authProvider: {
    'a-authgithub:github': {
      clients: {
        default: {
          clientID: 'xxxxxx',
          clientSecret: 'xxxxxxx',
        },
+       another: {
+         clientID: 'yyyyyy',
+         clientSecret: 'yyyyyyy',
+       },
      },
    },
  },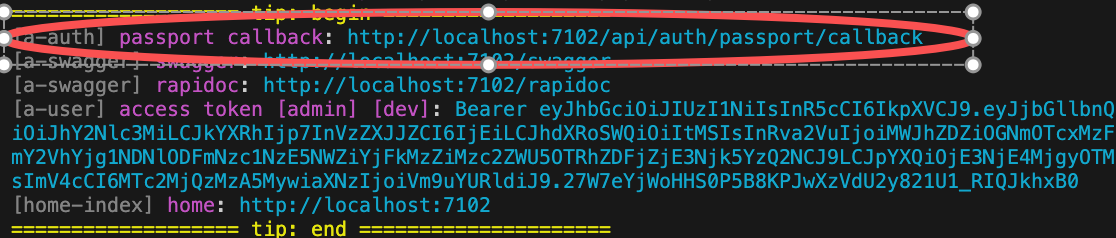
};5. OAuth认证Callback URL
在使用 OAuth 认证时,需要在 OAuth 网站提供系统的 Callback URL
VonaJS 提供了统一的 Callback URL 值,并且在开发阶段直接输出在控制台,方便我们直接使用
6. 禁用useMockForDev
在默认情况下,允许在开发环境模拟用户登录
可以在 App Config 中禁用useMockForDev
src/backend/config/config/config.ts
typescript
// onions
config.onions = {
  authProvider: {
    'a-authgithub:github': {
      useMockForDev: false,
    },
  },
};源码解析
这里对模块a-authgithub的核心源码进行解析,从而说明如何开发一个新的 Auth Provider
比如,在模块a-authgithub中创建一个 Auth Provider: github
1. Cli命令
bash
$ vona :create:bean authProvider github --module=a-authgithub2. 菜单命令
TIP
右键菜单 - [模块路径]: Vona Bean/Auth Provider
Auth Provider定义
diff
export interface IAuthProviderGithubClientRecord extends IAuthProviderClientRecord {}

export interface IAuthProviderGithubClientOptions extends IAuthProviderOauth2ClientOptions {
  userProfileURL?: string;
  userAgent?: string;
}

export interface IAuthProviderOptionsGithub extends IDecoratorAuthProviderOptions<
  keyof IAuthProviderGithubClientRecord,
  IAuthProviderGithubClientOptions
> {
  useMockForDev: boolean;
}

@AuthProvider({ useMockForDev: true, default: { confirmed: true, clientID: 'xxxxxx', clientSecret: 'xxxxxx' } })
class AuthProviderGithub {
  async strategy(_clientOptions, options) {
    return (this.app.meta.isTest || this.app.meta.isDev) && options.useMockForDev ? StrategyMock : StrategyGithub;
  }

  async verify(
    args,
    _clientOptions,
    _options,
    _state?,
  ) {
    return getStrategyOauth2Profile(args);
  }
}IAuthProviderGithubClientRecord: 定义多个 Clients,默认有default的定义IAuthProviderGithubClientOptions: 定义 Client optionsIAuthProviderOptionsGithub: 定义 Auth Provider 的参数strategy: 返回认证策略verify: 使用工具方法getStrategyOauth2Profile从认证结果中提取出 Profile 数据,并返回给系统
Profile
- Provider 的
verify只需返回 Profile 数据。系统将根据 Profile 数据生成 User 对象 - Profile 中存在
id字段值 - 由 OAuth 提供方确保为不同的用户生成唯一的
id值
Profile 具有统一的接口定义:
typescript
export interface IAuthUserProfile {
  id: string;
  username?: string;
  displayName?: string;
  name?: IAuthUserProfileName;
  gender?: string; // male/female
  profileUrl?: string;
  emails?: IAuthUserProfilePropSlice[];
  photos?: IAuthUserProfilePropSlice[];
  locale?: keyof ILocaleRecord;
  confirmed?: boolean;
}confirmed: 如果为true,意味着用户已经确认,不需要后续的激活操作